Showing posts with label Bella Beauty. Show all posts

November 4, 2011

Bella Beauty: A Modern Twist To The Cat- Eye


A tamed down version of the dramatic '60s style cat-eye has hit the makeup scene.
I am such a fan of this new cat-eye. It's a lot more subtle and so much more minimal than the typical cat-eye which is a bit over dramatic and make-upy looking for my taste. This look pairs up great with a very neutral face and lip.

My attempt to this simple and subtle trend.

To get the look you will need:

a quality liquid liner with a fine tipped pin applicator 
                            or
a quality gel liner and a eye liner brush.

Application Tips:

*Line the eye close to the lash line then slightly flick the line up once you reach the outter corner of your eye. For some it might take a bit of practice but it should be pretty easy to achieve after a few tries.

* Remember not to draw that line too thick!

*For a clean smooth line I always start with creating the little wings/flicks at each outer corner of my eyes first. Then I continue to draw the line inward towards the inner corner of each eye.

*It's best not to scribble back and forth to many times because this will create a messy line instead of a clean one. 

* If you mess up just use a pointed Q-tip dipped in a little makeup remover to clean up the mess and perfect the shape.


July 11, 2011

Beauty Deals & Thrills


Beauty Deals & Thrills

{ 1.Caribbean Solutions Water Resistant Sunscreen SPF25($16) 2.Croc Nano Titanium Classic 1" Flat Iron at Ulta ($99) 3.Auric Blend Fine Perfume Oils in Love 1/3 oz($7.50) 4.Burt's Bees Sugar Scrubs in Cranberry Pomegranate ($13) 5.Mineralogie Liquid Hydration Tinted Moisturizers($35) 6.Tarte LipSurgence-Lip Luster Natural Lip Tints($24) 7.Thayer's Alcohol Free Cucumber Aloe Toner($10) 8.NYC Metro Quartet Eye Shadows in Union Square($4) 9.Kiss My Face Liquid Rock Deodorants in Summer($6) 10.Yes To Cucumbers Soothing Eye Gel($15) }


May 25, 2011

When To Toss Your Cosmetics


Have you ever wondered when do good cosmetics go bad? Well here's a breakdown on the expiration dates of a few beauty basics. However, please keep in mind that you should immediately get rid of a product if it changes in color, texture, or smell.

1.Nail Polish

When To Toss: 1-2 years
Reason: Nail polish can last as long as a year or longer with proper storage. However, if you start to see signs of color fading or separation before then you might want to toss it. If  you don't it's less than likely that you'll get a smooth and glossy application/finish.
Tip: Store your polish in the refrigerator to increase its shelf life.

 2. Mascara

When To Toss: 3 months
Reason: Mascara can dry out and get clumpy rather quick, thus making it a breeding ground for bacteria (especially on the mascara's brush/wand). When there's bacteria there is a risk for eye infections and reusing the brush after an infection can cause recurrences...ouch.
Tip: Never pump the wand, this pushes air into the tube causing it to dry out faster.

3. Lipstick & Lip Gloss

When To Toss: 6 months-1 year
Reason: After a while lipsticks/glosses become little sticks of bacteria. This is due to the moisture content that most lipsticks/glosses contain. In addition to this, the moisture tends to dry up over time which in return can result in a cakey application.
Tip: After recovering from a cold, toss and replace the lipstick/lip gloss that you were using when you were sick (you can simply save yourself the trouble and money and skip out on using any lipstick/gloss as a whole when you're sick). It's the same concept of buying a new toothbrush after recovering from a cold or flu.

4. Foundation

When To Toss: 1-2 years
Reason: Every time you repeatedly dip your brushes and fingers into liquid foundation you increase the odds of bacterial growth (hence breakouts or irritation). Also, as it ages, foundation can go on unevenly, creating a streaky, inconsistent application. You might want to consider tossing liquid makeup after six months to a year. As for mineral or powder make-up it can last up to two years if stored properly and if it doesn't get wet. 

Tip: Don't keep your foundation in the bathroom due to poor storing conditions...hot and humid. Instead store in a cool dark place.

5. Sunscreen

When To Toss: 1 year 
Reason: Usually sunscreen is labeled with an expiration date. However, there's no harm in using it a year after opening (as long as it hasn't separated, changed in smell or color).

Tip: Take a permanent marker and mark the date of the day on which you opened your container of sunblock. This will serve as reminder of when a year will be from the date that you opened it.

6. Face Creams

When To Toss: 6 months-1 year
Reason: If the cream is in a jar your fingers transfer bacteria into the product after each use. So its a good idea to toss the jar after six to nine months. If the cream is in a pump container you can toss after a year.
Tip: Be sure to keep alpha-hydroxy creams tightly sealed or they can get more concentrated and cause irritation.


March 30, 2011

My Top 10 Beauty Tips


1.Moisturize. Moisturize. Moisturize.
Keeping your skin moisturized is key to maintaining skin that is soft, smooth, toned, and wrinkle free. A good trick is to use your favorite moisturizer immediately after you dry off from your shower/bath. This helps the skin absorb the moisturizer more efficiently. Also, you might want to consider using an all natural moisturizer. This will ensure that your skin is absorbing nothing but the best instead of perfumes, dyes, & harmful chemicals. I love using organic coconut oil or shea butter.


2. Freeze...Get Your Hands Off Your Face
Our hands are what I like to call little germ mobiles. They are in contact with everything, spreading bacteria from one thing to another. Hint, touching your face is not such a good idea. It can lead to breakouts. Speaking of breakouts, picking at a blemish only causes more harm. You're basically spreading more bacteria and damaging a "wound" that was in the process of healing. In the end the results are red irritated skin and scaring.


3. H2O For Sure
I'm sure everyone and their grandmother has told you this but it's true, drink water and a lot of it.  The body is primarily comprised of water. So it would be a good idea to keep it that way. If you don't like the taste of plain water try adding lemon or lime juice. Even better, try adding orange or grapefruit slices to your water. Put the soda, coffee, alcohol, and brightly colored red fruit drink down...I repeat...these types of drinks dehydrate your skin/body and just aren't good for your body period.


4. Stick To The Regimen
The key to any skin regimen is…staying on the regimen. Especially if you have acne prone skin. Once your skin has cleared, you will imagine you are no longer a person with acne. You could not be more wrong. Vigilance is all. Stick to the routine no matter what. Not sure what a skin care routine should entail, read Fall Back Into A Skincare Regimen... 


5. Catch Those Z's Girl
Sleep is very important for the body (and to me). It's a time when the body repairs and replenishes itself. Thus, getting the right amount of sleep is crucial. I would say 7-9 hours is best. I'm a napper so I'm a firm believer that a little cat nap does the body good.

6. A Little Sweat Won't Hurt
Exercise is also important for the body.  Exercise tone the muscles, keeps you fit, and  has been linked to slowing the aging process down. It also helps circulate the blood (great for a clear and healthy complexion) and aids in eliminating toxins via sweat.


7. Be A Natural Beauty
I'm not a fan of too much make-up. For one, I hate the removal process and secondly, I don't want to look like someone other than myself. My rules are:

* Make-up should not be used to create a whole new you. Rather it should be used to emphasize the already beautiful you God has designed you to be. 

Less is more. If you emphasize your eyes stick with a neutral lip. If you emphasize your lips stick with a neutral eye. Or just stick with an a la natural look for your entire face...always a winner in my book.

8. Laugh...A Lot
I love to laugh. Everyone who knows me know this. More importantly, a smile looks good on everyone and it's one of the cheapest beauty treatments around. Studies have shown that laughing:

* Reduces stress, nourishes the spirit, and is a natural antidepressant. 

* Is directly related to youth as well as beauty. 

* Affects your appearance in a good way. The facial muscles/tissues (lips, cheeks, etc.) are exercised and toned, which leads to an over all improvement in skin condition.

Audrey Hepburn said it best, "the happiest girl is the prettiest."

9. Multivitamin Anyone
I'm fan of a multivitamin supplement. Let's face it, it's hard to eat the required amounts of fruits, veggies, fiber, etc. at times . Here's where a good multivitamin can help out. It should be used to "supplement" and/or compliment your diet. Multivitamins are not a dietary replacement or should be a sole source of your daily essential nutrients.


10. Love Your Hair & It Will Love You Back
Your hair is one of the first things people notice about your appearance. That's why taking care of it is key. My rules to maintaining healthy hair:

* Keep it clean and conditioned. This is key for encouraging hair growth.

* Keep the ends trimmed every 6-8 weeks. This is key for retaining length and healthy hair.

Try to use all natural or naturally derived products.

February 9, 2011

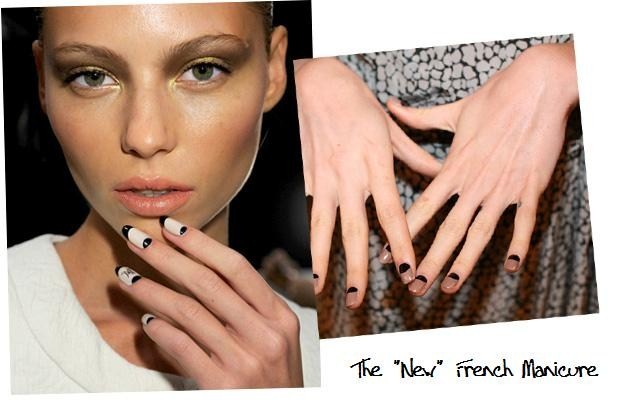
DIY Half Moon Manicure


The Half Moon Manicure is the edgier kid sister of the French Manicure. Lately it seems as though I've been spotting this nail trend everywhere. So of course I bit the bullet and stepped out of the box of "Plain Jane" and tried it out. I must say it took me a second or two to warm up to the manicure but I actually like the sense of uniqueness and chic-ness it adds. On the other hand, I did weird-out a few people, but after the first glance...or two...or three, they liked it.


When trying out this DIY beauty project you can keep a slight retro feel by using neutrals with black(if you're more of  the unique and daring type). You also go more monochromatic with 2 different shades of one colour (if you're more of the chic and simple type).


You Will Need:

Base Coat {I used SinfulColors Professional Base Coat}
Primary Color {I used Rimmel Lasting Finish Pro in Steel Grey}
Accent Color {I used Rimmel Lasting Finish Pro in Midnight Blue}
Top Coat {I used SinfulColors Professional Topcoat}
French Manicure Stickers


Step 1: Paint your nails with a base coat to prevent staining and to extend the life of your manicure.


Step 2: Paint your nails with two coats of the primary color of choice. Allow to dry for 20-30 minutes or until completely dry.


Step 3: Apply the French Manicure stickers near the base of your nails (not the tips). For a crisp clean line, make sure to rub the sticker on the nail and that there are no ridges or raised areas where the sticker and nail meet.

Paint the area (base of nail) below the sticker with two coats of your accent color and allow to dry for 20-30 minutes prior to removing the sticker.  Remove the sticker and touch up nails as needed. You can use a q-tip dipped in nail polish remover to remove any excess polish from the cuticles or skin.

**Note: I chose to free-hand the half moon shape but only do this if you have a straight and steady hand.**


Step 4: Top with a top coat. And voila you should have a perfect manicure...enjoy!


January 5, 2011

Treat Your Tired Tresses| The Hot Oil Treatment


 Everyone with any hair type (kinky, curly,wavy ,straight, thick, thin, dry, oily, etc.) can benefit from hot oil treatments. For those of you who don't know what a hot oil treatment is, it's basically applying a warm mixture of oils to the hair and scalp to condition and repair. There are some awesome benefits to doing hot oil treatments. So let take a closer look of what they are and some other helpful tips...


 Benefits Of Hot Oil Treatments:                                                                        


*Adds much needed moisture to hair.

*Prevents breakage of hair over time.

*Makes hair more manageable.

*Gives hair a shinier healthier appearance.

*Contributes to a healthier scalp which is needed for hair growth.


How It Works:                                                                                                        


*Fill a container (the ones used for hair coloring are great) with selected oil(s).

*Heat container in a warm water bath...oil should be warm and not hot.

*Divide wet or dry hair into sections and apply treatment from scalp to ends...make sure you massage your scalp.

*Put on a plastic cap and allow treatment to set for at least 30 minutes.

*Shampoo and condition hair as usual ( those w/dryer, thicker, coarser, kinky-curly hair can apply a hot oil treatment after shampooing but before conditioning to ensure more moisture).


Best Types Of Carrier Oils To Use:                                                                  


[picture source]
  Carrier oils are vegetable oils derived from the fatty portion of a plant, usually from the seeds, kernels or the nuts. In natural hair care preparations, carrier oils are typically referred to as base oils. They can be mix with one another or used on their on depending on your hair type and needs.


Jojoba ( Repairs & Moisturizes/All Hair Types): this oil is very similar to the natural oil or sebum that is produced by the sebaceous glands of the scalp. Hair that has been extremely damaged or that breaks, splits, or tangles easily usually  responds well to this moisturizer. Stores well, it can store w/out going rancid.


Organic Extra Virgin Olive Oil ( Heals & Moisturizes/Coarse-Thick Hair): this oil is great for hair that is dry or damage, and also works extremely well on  thick, coarse hair. Olive oil is also suitable for use in the treatment of scalp conditions and dry skin. Stores well if kept sealed and in a dry dark area.


Organic Extra Virgin Coconut Oil (Nourishment & Shine/All Hair Types): this oil is great for providing a healthy shine, uber softness, minimize tangles, and encourages growth. Coconut oil is also recommended for the control of dry scalp and dandruff. Coconut oil is one of the few oils that doesn't sit on top of the hair but it penetrates beneath it. Stores well if kept sealed. It's a solid at room temperature but it melts very easily when rubbed between palms of hands.


Organic Hemp Seed Oil (Repairs& Strengthens/All Hair Types): this oil is light to the touch and is easily absorbed by dry or damaged hair follicles. Encourages stronger, more resilient hair. It's a great oil to add to other oils and your shampoo/conditioner. It doesn't store that well (2-3 months refrigerated) so buy in small batches and refrigerate after opening.


Avocado Oil (Stimulates Hair Growth/All Hair Types) : nourishes and restores softness to dry, dehydrated and mature hair and great for those with scalp issues such as dandruff or psoriasis. Doesn't store that well so buy in small batches and refrigerate after opening.

Best Types OEssential Oils To Use:                                                              

[picture source]
 Essential oils are oils distilled from the leaves, bark, roots and other portions of a botanical. Essential oils should ALWAYS be diluted in a carrier oil when doing a hot oil treatment!


Lavender Essential Oil: is found to be effective for hair loss prevention and hair growth. Aids in scalp wound healing. It's very soothing and calming .


Peppermint Essential oil: is found to be an excellent hair nourisher. Improves the blood circulation towards the root of the hair and thus helps in hair growth and nourishment. It's very cooling and invigorating.


Tea Tree Essential Oil: encourages hair growth, nourishment of hair, and also extremely beneficial  for those who suffer with excessive dandruff and psoriasis. Minimizes scalp oil production. Has a distinct aroma.


Rosemary Essential Oil: used for hair loss and dandruff and can be mixed with most other essential oils for increased results. It is believed that this oil slows down the premature hair loss (baldness) and graying of hair as we aged.


My Favorite Hot Oil Recipe:                                                                             


*1/4 cup of organic extra virgin olive oil
*1/4 cup of organic extra virgin coconut oil
*2-3 tablespoons of organic hemp seed oil
*3-4 drops of lavender oil


*the amount of each ingredient might vary on hair length and type so adjust measurements and/or usage accordingly (i.e. shorter or thinner hair require much less and longer or thicker hair requires much more)*


December 23, 2010

Up, Up, & Away| Basic Up-dos

Up-dos are a great means to give you and your hair a break from tedious styling. For the most part I consider up-dos fuss free styling. But fuss free styling doesn't mean you can't look put together. I have four go to up-dos that never seem fail me. A ponytail, a bun, a side twist style, and a chignon.


Ponytail hairstyles are timeless. From curly to straight hair almost anyone can pull this style off. Not to mention this is a low maintenance style. Although ponytails are simple they are very versatile. Looks can range from neat and tidy. Messy. Curly. Straight. High. Low. Thus the list can go on and on.

To Create The Basic Ponytail:                                                                                
  •  Use a comb,brush, or fingers and gather the hair back in the position you wish to secure the ponytail.
  • Bring to the desired position, take hair elastic and wrap it tightly close to the scalp.  
  • In order to conceal the hair elastic separate a thin strand of hair from the ponytail and wrap it over the elastic until you reach the end which you will secure under the pony using a bobby pin.  


 A bun is a great way to style your hair if your looking for quick and easy sophistication. It's definitely my number one go to style. Like the ponytail this style is very versatile. Looks can range from neat and tidy. Messy. Curly. Straight. High. Low.

To Create A Basic Bun:                                                                                   

  •  Secure your hair in a ponytail. Position the ponytail about where you want the bun to lay.
  • Twist the tail either in two sections or one. Those with longer, thicker hair may want to separate the tail into 2 pieces.
  • Guide the twist into a coil/circle around the ponytail holder. For those with longer, thicker hair, bobby-pin the coil into place as you wind it around and around the ponytail holder. People with shorter, thinner hair can often get away with winding and twisting the coil first and then inserting bobby pins about 45 degrees apart from each other.
*instructions courtesy of wikiHow.com*


 A side twist/braid can spunk up a basic ponytail or bun style. A side twist/braid can be done on just one side or both sides of the head. I love the look of both options. Side twist are great on both curly or straight hair.

To Create A Side Twist:                                                                                           
Due to the fact that a side twist is easier done than said (or written) I've included a "how to" link to allow you to get this look...click here . 


Chignons (pronounced Shin-Yon) are like the upgraded modern version of the bun. They're elegant yet simple.  This style can be worn either as casual-chic or formal. There are a variety of styles you can create depending on personal preference as well as hair length.

To Create The Basic Chignon:                                                                                                  
  •  Brush your hair back into a low ponytail.
  • Get a firm grip around the base of the ponytail and use your other hand to twist the tail into a tight spiral. Hold the base of the ponytail with one hand, then lift the tail straight up with the other.
  • Begin to coil it clockwise around the base. When you've made half of a circle, release the hand holding the base and use it to hold the forming bun as you continue to coil the tail of the chignon. Complete one rotation - a little more if you have longer hair - then tuck the end of the tail under the chignon. If your hair is long enough, you might be able to push the tail through the bun and make a knot.
  • Secure the chignon using a few prong-shaped bobby pins or a hair stick. Push one pin through at any outside edge, collecting a small amount of the bun as you make the insertion. Secure the opposite side with a second pin.
  • If you're using a hair stick, push the tip up through the right corner of your chignon, so that a thin flat layer rests on top of the stick. Rotate the stick 180 degrees and push it gently through the base of the bun. As the stick begins to emerge, hook a small amount of hair on the underside of the left corner, then center the stick.

 *instructions courtesy of eHow.com*
  

October 26, 2010

The Bold & The Beautiful


[picture source]

Lips that are bold and make a statement are definitely "it"  right now. Everything from fire engine red, deep burgundies, pretty pinks, to wow shades of orange are all on the color radar. Successfully rocking this trend might seem a little tricky but it's rather easy.  Once I realized this, I fell in love with the red and pink hues thus I took a try at it and loved the results. However, there were a few basic principles that helped me have successful results...


Choosing the right red can be a difficult task yet as overwhelming as it seems, it’s actually easy when you know your skin undertone. If your undertone is warm (there’s a yellow or golden undertone to your skin, you tan to a golden brown color, your veins are green, you look best in gold, etc.), then a red with a yellow or golden base works best. If your undertone is cool (there’s a red or blue undertone to your skin, your veins are blue, you look best in silver, etc.) then a red with a blue base works best. If you’re olive toned (neither yellow nor blue undertones) try a red with neutral undertones.


As with its sister shade red, knowing your skin undertone first will make choosing the right shade of pink a piece of cake. If you’re warm toned, go for yellow based pinks. If you’re cool-toned, go for blue based pinks. Neutral/Olive tones, go for neutral pinks. Remember the darker your skin, the brighter the lip color.

Tips To Help You Successfully Rock This Trend:                                           

1. First and foremost you need a little CONFIDENCE! Wearing a bold lip is not for those who want to blend into the crowd. None the less, "standing out" can still look classic and chic.

2. A bright lip can be strong so keep the rest of your makeup relatively understated. I'm sure you're not going for the "circus clown" look.

3. Exfoliate your lips. Making sure your lips are as smooth as possible helps lip product adhere better to the lips. You can invest in a pricey lip exfoliant. But why do so when you can go the cheaper yet still effective route that doesn't contain possible harmful chemicals. You can simply use your toothbrush splashed with water and gently rub the lips. Or you can take a dime to quater size amount of olive oil and a pinch of sugar for a DIY mixture.

4. Prime your lips. This moisturizes the lips and gives the lipstick something to hold onto which insures long lasting wear. You can invest in a lip primer but I just use good ole plain lip balm (Burt Bees-Beeswax Lip Balm)!

5.  Successful lip color application. For intense color payoff, start with a cream finish lipstick then apply a gloss in a similar shade on top(sometimes I use a clear gloss). Rub your lips together, blot, and then reapply the gloss.

September 24, 2010

Earth Science Skin Care|Product Review


When it comes to my top three skin care items that I can not do without it's got to be Earth Science's A-D-E Creamy Face Cleanser; Earth Science's Aloe Vera Complexion Toner; and Earth Science's Herbal Tonic Mist/Oil Free Moisturizer. I use these products everyday, twice a day. I love them so much I recommend them to most people I know! Take a closer look below at my beloved staple products and an overview of the company.


Company's Mission Statement:                                                                                


"We have been making natural body care products for over 30 years, and have always been guided by one principle, to try our hardest to make something special. Earth Science is a business, but it is much more than that to us. This is our creation, our craft, our profession, and we care deeply about what we do. With every product we formulate, we set out to make something that will deliver great results at a great value. We never compromise on quality.


Times change, tastes change and we change with them. However, one thing never changes: We are always motivated to make the best products, using the finest, most effective, natural ingredients.


We care about you, our customers, and about the planet we all share. While so many other companies are owned by large corporate parents, we remain a family business, and we put our human hearts into the products we make. We are motivated to make a positive contribution to your life, and to our planet."


My Favorite Picks:                                                                                              


A-D-E Creamy Cleanser
Product Claim:                                                                                     
Formulated with rich natural fruit oils in a creamy base to cleanse the skin and remove make-up and impurities without using drying soaps. Moisturizes while it cleanses to keep skin soft with no greasy feeling. Excellent for removing oil based cosmetics. Use daily as a routine cleanser for dry and normal skin. Hypo-allergenic. pH 5.0


My Claim:                                                                                            
My skin type is that of part acne prone, part combination,( a little oily/a lot dry), and primarily sensitive. I know...it's crazy. But when I discovered this facial cleanser (2 years ago) I wasn't too sure if it would improve my skin at the time. My skin was in a stage of a crazy breakout period mix with some hyper-pigmentation going on. I figured what the heck I've tried everything else. I also wanted to transition into using natural and/or organic based products. So I gave this cleanser a shot and within a week's time I noticed significant changes. My skin slowly but surely began to clear up and the hyper-pigmentation marks from the acne were slowly fading. I also concluded that the majority of my breakouts were due to using too harsh of a  product on my sensitive skin which exacerbated my dryness even more.


Aloe Vera Complexion Toner & Freshener
Aloe Vera Complexion Toner & Freshener - 8 oz.
Product Claim:                                                                                    
Natural, alcohol-free, cooling toner completes the cleansing process for normal to dry or sensitive skin types. Herbal extracts, aloe, panthenol and hyaluronic acid nourish and protect the skin while normalizing the skin's pH to 4.0 - 6.0. Removes any last traces of cleansers or make-up. Refines, purifies and prepares skin to accept moisturizers. Hypo-allergenic. pH 5.5


My Claim:                                                                                           
So after trying and loving the A-D-E cleanser I decided to get the aloe vera complexion toner. And of course I loved it too! It calmed, moisturized, and balanced my inflamed, parched, combination skin. Due to the high content amount of aloe vera in this toner, my skin was able to "heal."  I now know that my skin loves aloe based products. I also noticed that this toner helped my acne heal faster and helped minimize scaring/hyper-pigmentation marks from acne. It also does a great job of getting any last trace of dirt or make-up.


Herbal Tonic Mist Skin Rejuvenator and Oil-Free Moisturizer
Herbal Tonic Mist - 8 oz.
Product Claim:                                                                                     
For all skin types, Herbal Tonic Mist is a 100% oil-free moisturizing spray that contains rare hyaluronic acid in a special skin replenishing fine mist. Use as a light moisturizer for the face or the entire body. So light it can be sprayed over make-up, this special herbal blend soothes and cools the skin. Also relieves redness, irritation and the discomfort of mild sunburn. Hypo-allergenic. pH 5.0


My Claim:                                                                                           
I have tried a lot of moisturizers out there. My skin pretty much hated all of them. When I say hate I mean breakout city! Whenever my skin does not like a product it pretty much breaks out. That being said, my skin did not have that reaction to this moisturizer. Instead it made my skin look dewy and smooth opposed to making it feel/look oily . This moisturizer puts just enough moisture into my skin and it's very light so it sinks right in. 


*pictures, mission staement, and product claims are sourced from the Earth Science website


LinkWithin

Related Posts Plugin for WordPress, Blogger...